
Advertisement pixels provide a communication path between your website and your advertisement platform, which nowadays range from social media sites like Instagram to search engines like Bing. Pixels are a great way to target users that are most interested in your content with your campaigns. This is how I implement advertisement pixels on websites. I would recommend putting your campaigns on hold during the implementation process and documenting the entire setup for transparency purposes.
-
I would always recommend implementing advertisement pixels through your tag management system instead of hardcoding them into your website. Not only is this method flexible and easy, but it also allows you to load your pixels based on user consent (if you are running a consent banner).
Some tag managers, such as Google Tag Manager, have templates for popular advertisement pixels where you just have to enter your account id. These templates are usually worth testing out. If they fail to load, or have issues sending data consistently, you can always fall back on a customHTML tag. Ensure you check the documentation for each pixel - they are not all the same! -
Gather account details and conversion IDs
As I work at an agency, we always create a document where all IDs and account numbers are listed for our client to fill out with the correct information. I use this document as a single source of truth and update each pixel with a status to initiate testing. -
Setup base pixel
I like to start with this first as it will be a good indicator to whether your implementation method works or not. The base pixel is usually linked to a page load trigger and data should be sent every time a new page is opened. If your website is a single-page-application (SPA) it will be very important to get this page load trigger working correctly. You might need to consider history changes or even something completely custom linked to the dataLayer. If you have a consent banner, ensure that data is only being sent once consent is given and not before. -
Setup conversions
You might only want a base pixel retargeting users based on pages viewed on your website. However you might want to consider setting up specific conversions based on key interactions on your website. Here are three examples for a website selling language learning courses:
- Base pixel sending data on every page load → Users who visited at least one page of this language school will be targeted with an advertisement. This is a very large segment of users that might or might not be interested in taking a course.
- Pixel sending data on upcoming courses page → Users who visited at least one of the course information pages will be targeted. The segment has become much smaller and users that you retarget are more motivated to click on your advertisement.
- Pixel sending data on brochure download → Users who downloaded a specific brochure will be targeted. This segment is the smallest of the examples and consists of a group of users who are the most likely to take a course at your school and are most inclined to click on your advertisement.
Once you have set up your conversions, go through each event and see if data is being sent. You can use the list below to test if your advertisement pixels are sending data. If you have access to the advertisement platform, it's definitely worth checking that too.
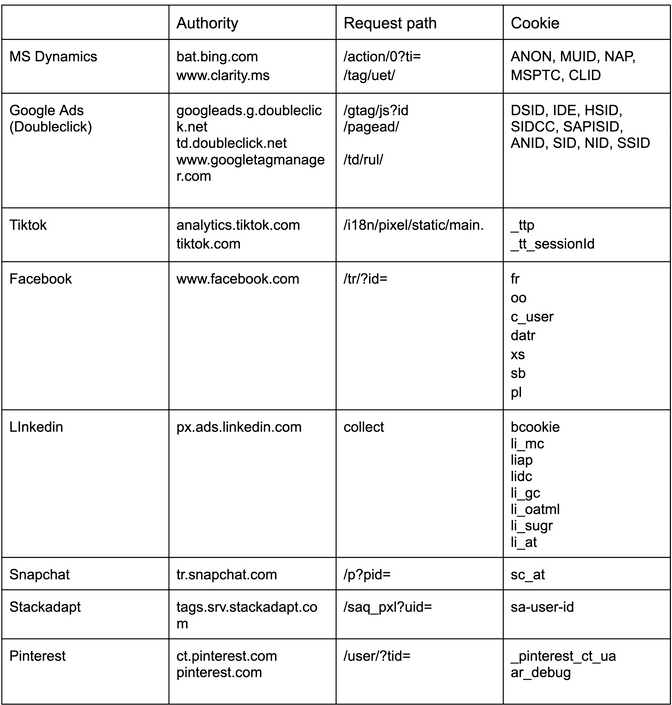
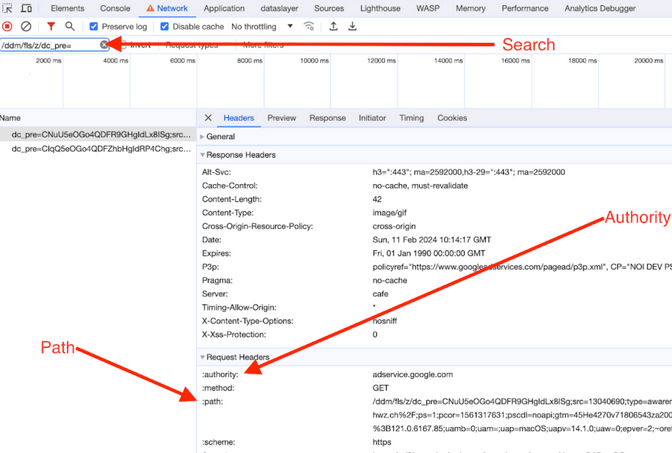
You can use the search field in the network request tab to search for any of the following terms mentioned above to match your pixel. Ensure you refresh the page when testing in the developer console. If you cannot find your pixel anywhere, one last idea would be to search for your advertisement account ID or conversion label.
Good luck setting up your pixels! If you need any technical or strategic support - you can always reach out to us.