
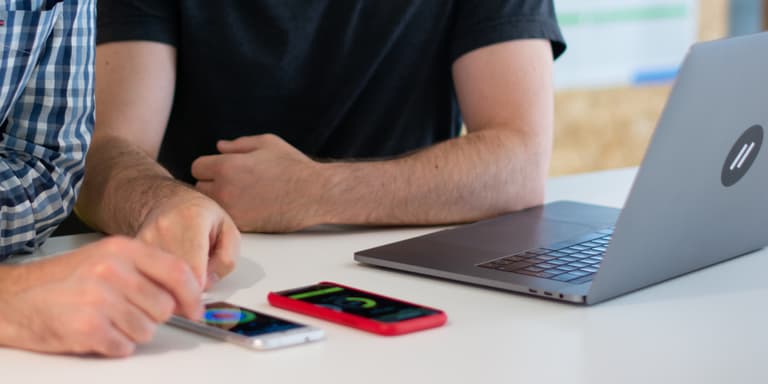
Recently at Liip, we had the chance to work with Bobst SA. They sell machines that need to be authenticated and wanted to improve their current process, during which clients had to use a special tool to scan the machine and manually report a reference in Bobst's web portal. Instead, their new process uses RFID tags. Our goal was to create a mobile app able to scan these tags, and automatically connect to the user's account on Bobst servers to grant them the correct certificate. The app would then allow them to write back this certificate on the machine.
Technologies
For this app, like for most apps we create at Liip, we chose to work using the native technologies for both platforms and created the Android app using Kotlin (Kotlin version 1.4.10, target Android 11 - API 30) and the iOS app using Swift (Swift 5, target iOS 14).
We usually prefer using these technologies over cross-platform alternatives for various reasons including performances, reliable UI experience for users of both platforms and maintainability. In this case the choice was even more obvious as the NFC capabilities are part of the built-in systems libraries. A cross-platform app would therefore anyway require bridges modules for both platforms.
RFID Standards
RFID simply references radio frequency identification, and simple RFID tags don't even need to be powered. RFID devices can be implemented following various standard. Along them, the ISO 15693-3, used by the Bobst tags.
NFC or Near field communication, is a more precise subset of radio frequency devices. NFC devices can be both tags and readers and can communicate actively together. Modern mobile phone almost all have NFC capabilities. The standard way for NFC devices to communicate is to use NDEF (NFC Data Exchange Format), however, when communicating with RFID ISO standards, some other format must be used, for instance: NFC Type 2 (akaType A) and Type 4 (aka Type B) are used to communicate with the RFID ISO standard 14443.
In our case, we will use NFC type 5 (aka Type V) to communicate with our ISO 15693 tag
Android NFC support as of may 2021
| Type | Description |
|---|---|
| NfcA | Provides access to NFC-A (ISO 14443-3A) properties and I/O operations. |
| NfcB | Provides access to NFC-B (ISO 14443-3B) properties and I/O operations. |
| NfcF | Provides access to NFC-F (JIS 6319-4) properties and I/O operations. |
| NfcV | Provides access to NFC-V (ISO 15693) properties and I/O operations. |
| IsoDep | Provides access to ISO-DEP (ISO 14443-4) properties and I/O operations. |
| Ndef | Provides access to NDEF data and operations on NFC tags that have been formatted as NDEF. |
| NdefFormatable | Provides a format operations for tags that may be NDEF formattable. |
| MifareClassic | Provides access to MIFARE Classic properties and I/O operations. ⚠️ Optional: There is no guarantee that an Android phone with NFC supports this type |
| MifareUltralight | Provides access to MIFARE Ultralight properties and I/O operations. ⚠️ Optional: There is no guarantee that an Android phone with NFC supports this type |
iOS NFC support as of may 2021
| Type | Description |
|---|---|
| NFCISO7816Tag | An interface for interacting with an ISO 7816 tag. |
| NFCISO15693Tag | An interface for interacting with an ISO 15693 tag. |
| NFCFeliCaTag | An interface for interacting with a FeliCa™ tag. |
| NFCMiFareTag | An interface for interacting with a MIFARE® tag. |
| NFCNDEFTag | An interface for interacting with an NDEF tag. |
Implementation on both platforms
Using the tables above, we see that both Android and iOS can support the Bobst RFID chips. We needed to use the Android NfcV type and the iOS NFCISO15693Tag type.
Both systems also need to be granted the appropriate permission to access the NFC capabilities, but both Android and iOS docs cover this part in detail.
In short, our implementation needed to support three operations:
- Identify a tag in range
- Read the content on the tag
- Write new content on the tag
And we used these operations in the following way:
- Identify and read: Wait for a tag to be identified (the system will receive its unique ID), then use this unique id to request a read operation
- Send the result of the read operation to the Bobst serveur to receive a certificate (no RFID operation here)
- Identify and write: Identify a close tag again and be sure it has the same id as the one we previously read (it is the same tag). Then proceed to write the certificate to it
Step 1: Identify a tag
Both systems provide an easy way to receive the id of a nearby tag but they differ slightly:
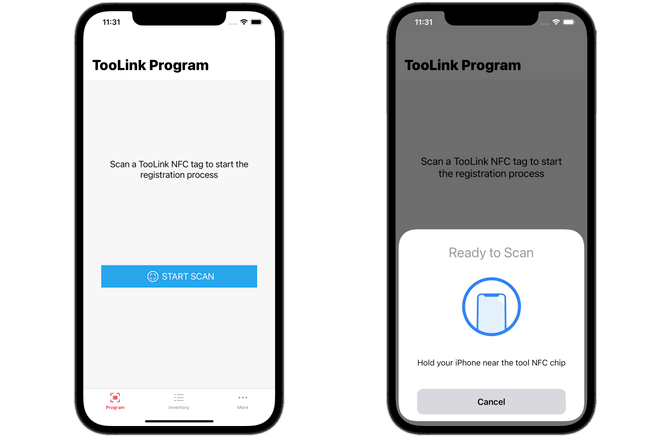
On iOS we need to ask the system to start identifying RFID tags. At this point the user sees a small modal view and the system waits for a tag to be found. Basically, the following line are all it takes
func startScan() {
    guard  NFCTagReaderSession.readingAvailable else {
        delegate?.onScanningNotSupported()
        return
    }
    nfcSession = NFCTagReaderSession(pollingOption: NFCTagReaderSession.PollingOption.iso15693, delegate: self, queue: **nil**)
    nfcSession?.alertMessage = ... // whatever alert message such as "hold the phone near the tag"
    nfcSession?.begin()
}

func stopScan() {
    nfcSession?.invalidate()
}
On Android the system works using the Android Intent mechanism. This means that we need to register the app to accept scan intents of the appropriate NFC type. Once it is done our app will be notified. As a result, there is no start button to push. In fact, even if the app is closed when a tag is in range, the app will open and get notified right away!
Register the NFC capability in the manifest, in the Activity that will receive the information:
<intent-filter>
    <action android:name="android.nfc.action.TECH_DISCOVERED" />
</intent-filter>
<meta-data
    android:name="android.nfc.action.TECH_DISCOVERED"
    android:resource="@xml/filter_nfc"
/>
Add the filter list in the resource file we referenced in the manifest, like xml/filter_nfc/xml (in ours case, we simply the type NfcV, as in the table above):
<resources xmlns:xliff="urn:oasis:names:tc:xliff:document:1.2">
    <tech-list>
        <tech>android.nfc.tech.NfcV</tech>
    </tech-list>
</resources>
Our activity will be notified via onNewIntent:
override fun onNewIntent(intent: Intent) {
  super.onNewIntent(intent)

  if (NfcAdapter.ACTION_TECH_DISCOVERED == intent.action) {
    val tag = intent.getParcelableExtra<Tag>(NfcAdapter.EXTRA_TAG)
    viewModel.scanned(tag)  // Or whatever else
  }
}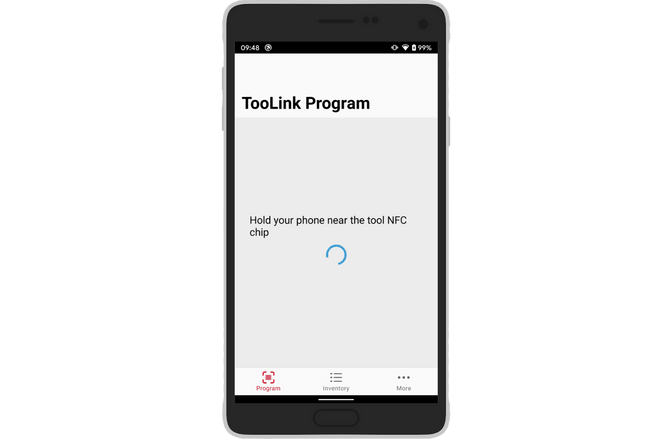
The two platform have a clear difference in user experience, but still work in the following way: The steps above only result in a Tag object containing the id of the detected tag. We now need to use it to read or write what we need
Step 2: Read a tag
On iOS the system already contains a basic implementation of the ISO 15693 standard, which will make our lives easier.
The exact implementation will depend on specific needs but basically, the idea is to convert the generic Tag ID into the proper ISO implementation built-in in the Core NFC library:
if case let NFCTag.iso15693(tagType5) = tag {
}
And then use built-in functions such as tag.readMultipleBlocks(). This function accepts a number of arguments including handy requests flags.
tag.readMultipleBlocks(requestFlags: [.highDataRate], blockRange: NSRange(location: 0, length: NfcService.MAXREADBLOCK)) { data, error in
... // check for error and get data using the variables above
}
At that point, the only difficulty it to figure out how the bytes have been arranged. Bobst provided us with an accurate documentation to allow us to read their tags properly. Typically, in our case they were arranged in blocs of four that needed to be reversed individually once read.
On Android The system does not provide built in implementation of the ISO standard appart fonctions to send raw blocs of bytes. These raw blocs contain a command request for the tag, arranged according to ISO 15693 https://www.iso.org/standard/73602.html
The first step is very similar to iOS: obtain the system type corresponding to our tag
val nfcVTag = NfcV.get(tag) ?: returnBut the next part is trickier. The 70-page long document describing ISO-15693 tells us, among all possible command, that the readMultipleBlocks we found build-in by iOS, is in fact issued by sending the command code 0x23.
It also tells us that to send a command, we need to send the following information
— flags
— command code
— mandatory and optional parameters fields, depending on the command
In our case, we need to set the flags to issue and "Addressed" command, meaning that the command takes the tag id as argument and only executes on this specific tag. The documentation tells us that this flag corresponds to the 6th bit of the flag's byte. We will also set high-rate flag (2nd bit).
Our total flag byte is 00100010, which translates to 0x22.
This means that our android request will consist of the following byte array:
val offset = 0 // offset of first block to read
val blocks = 32 // number of blocks to read
val cmd = mutableListOf<Byte>().apply {
  add(0x22.toByte()) // flags: addressed (= UID field present) + high data rate
  add(0x23.toByte()) // command: READ MULTIPLE BLOCKS
  addAll(tag.id.toList()) // tag UID
  add((offset and 0x0ff).toByte()) // first block number. add 0xff to ensure we send two bytes
  add((blocks - 1 and 0x0ff).toByte()) // number of blocks (-1 as 0x00 means one block). add 0xff to ensure we send two bytes
}.toByteArray()
We simply receive the answer with the transceive method and check the first byte to ensure the success
nfcVTag.connect()
val responseBytes = nfcVTag.transceive(cmd)
if (responseBytes.first() != 0x00.toByte()) {
  return NfcResponse.Error.Read
}
nfcVTag.close()
The response byte array could now be parsed according to the Bobst documentation, allowing us to extract the correct tag information.
Step 2: Write to a tag
Writing to a tag is roughly the same process as for reading it (ie. a simply one on iOS, and a more complex one on Android)
On iOS We compile all the information we will need to write in a byte array. unfortunately, the multiple writes was disable on the Bobst tags, meaning that we had to send the bytes one by one. We simply used NFC Core function writeSingleBlock in a loop. Once again, the function takes all the necessary flags
tag.writeSingleBlock(requestFlags: [.highDataRate, .address], blockNumber: UInt8(startBlock), dataBlock: dataBlock) { error in
    ... // Simply check for error and react accordingly
}
On Android
As before we need to send the appropriate byte command and use the transceive function. As before, this command will use a flag value of 0x22. The ISO 15693 documentation states that the writeSingleBlock request is issued by passing 0x21as command byte. As before we need to pass the tag id since we perform an "Addressed" command. We can then pass the id bytes followed by all the data we want to write
private fun createCommand(tag: Tag, blockOffset: Int, blockData: List<Byte>) = mutableListOf<Byte>().apply {
  add(0x22.toByte()) // flags: addressed (= UID field present) + high data rate : 00100010
  add(0x21.toByte()) // command: WRITE SINGLE BLOCK (multi read not supported)
  addAll(tag.id.toList()) // tag UID
  add((blockOffset and 0x0ff).toByte()) // first block number. add 0xff to ensure we send two bytes
  addAll(blockData) // The bytes for certificate and reference,
}.toByteArray()
As for iOS, we will need to call this function in a loop, passing the correct block offset to write all the blocks one by one
Conclusion
While the user experience only differs slightly between Android and iOS, the implementation of read and write calls on ISO 15693 tags is quite more complex on the Android side.
We often see this kind of divergence between both platforms: The iOS framework tends to provide a simple experience for developers by providing standard implementations of many features, while Android often leaves more freedom in the implementation, which comes at the cost of additional work required to achieve the same result.