
Creating a CoreML model from A-Z in less than 10 Steps
This is the third part of our deep learning on mobile phones series. In part one I have shown you the two main tricks on how to use convolutions and pooling to train deep learning networks. In part two I have shown you how to train existing deep learning networks like resnet50 to detect new objects. In part three I will now show you how to train a deep learning network, how to convert it in the CoreML format and then deploy it on your mobile phone!
TLDR: I will show you how to create your own iPhone app from A-Z that recognizes handwritten numbers:
Let’s get started!
1. How to start
To have a fully working example I thought we’d start with a toy dataset like the MNIST set of handwritten letters and train a deep learning network to recognize those. Once it’s working nicely on our PC, we will port it to an iPhone X using the CoreML standard.
2. Getting the data
# Importing the dataset with Keras and transforming it
from keras.datasets import mnist
from keras import backend as K

def mnist_data():
    # input image dimensions
    img_rows, img_cols = 28, 28
    (X_train, Y_train), (X_test, Y_test) = mnist.load_data()

    if K.image_data_format() == 'channels_first':
        X_train = X_train.reshape(X_train.shape[0], 1, img_rows, img_cols)
        X_test = X_test.reshape(X_test.shape[0], 1, img_rows, img_cols)
        input_shape = (1, img_rows, img_cols)
    else:
        X_train = X_train.reshape(X_train.shape[0], img_rows, img_cols, 1)
        X_test = X_test.reshape(X_test.shape[0], img_rows, img_cols, 1)
        input_shape = (img_rows, img_cols, 1)

    # rescale [0,255] --> [0,1]
    X_train = X_train.astype('float32')/255
    X_test = X_test.astype('float32')/255

    # transform to one hot encoding
    Y_train = np_utils.to_categorical(Y_train, 10)
    Y_test = np_utils.to_categorical(Y_test, 10)

    return (X_train, Y_train), (X_test, Y_test)

(X_train, Y_train), (X_test, Y_test) = mnist_data()
3. Encoding it correctly
When working with image data we have to distinguish how we want to encode it. Since Keras is a high level-library that can work on multiple “backends” such as Tensorflow, Theano or CNTK, we have to first find out how our backend encodes the data. It can either be encoded in a “channels first” or in a “channels last” way which is the default in Tensorflow in the default Keras backend. So in our case, when we use Tensorflow it would be a tensor of (batch_size, rows, cols, channels). So we first input the batch_size, then the 28 rows of the image, then the 28 columns of the image and then a 1 for the number of channels since we have image data that is grey-scale.
We can take a look at the first 5 images that we have loaded with the following snippet:
# plot first six training images
import matplotlib.pyplot as plt
%matplotlib inline
import matplotlib.cm as cm
import numpy as np

(X_train, y_train), (X_test, y_test) = mnist.load_data()

fig = plt.figure(figsize=(20,20))
for i in range(6):
    ax = fig.add_subplot(1, 6, i+1, xticks=[], yticks=[])
    ax.imshow(X_train[i], cmap='gray')
    ax.set_title(str(y_train[i]))
4. Normalizing the data
We see that there are white numbers on a black background, each thickly written just in the middle and they are quite low resolution - in our case 28 pixels x 28 pixels.
You have noticed that above we are rescaling each of the image pixels, by dividing them by 255. This results in pixel values between 0 and 1 which is quite useful for any kind of training. So each of the images pixel values look like this before the transformation:
# visualize one number with pixel values
def visualize_input(img, ax):
    ax.imshow(img, cmap='gray')
    width, height = img.shape
    thresh = img.max()/2.5
    for x in range(width):
        for y in range(height):
            ax.annotate(str(round(img[x][y],2)), xy=(y,x),
                        horizontalalignment='center',
                        verticalalignment='center',
                        color='white' if img[x][y]<thresh else 'black')

fig = plt.figure(figsize = (12,12))
ax = fig.add_subplot(111)
visualize_input(X_train[0], ax)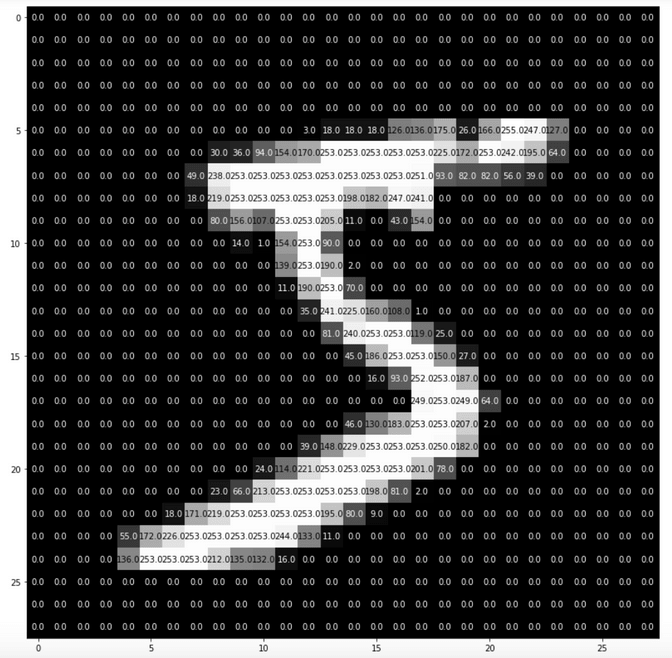
As you noticed each of the grey pixels has a value between 0 and 255 where 255 is white and 0 is black. Notice that here mnist.load_data() loads the original data into X_train[0]. When we write our custom mnist_data() function we transform every pixel intensity into a value of 0-1 by calling X_train = X_train.astype('float32')/255 .
5. One hot encoding
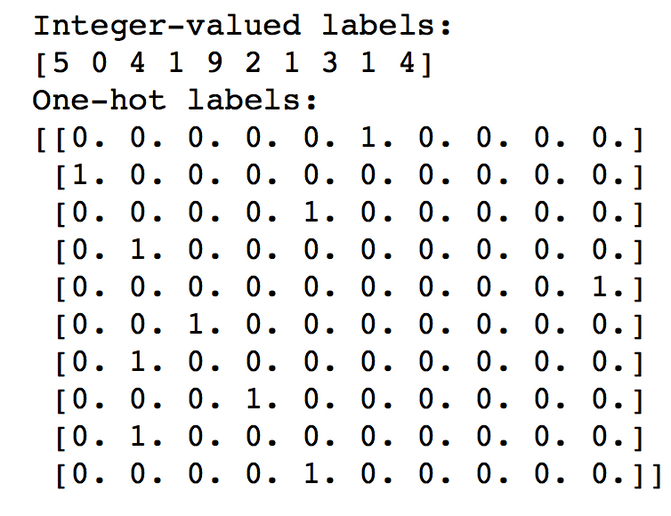
Originally the data is encoded in such a way that the Y-Vector contains the number value that the X Vector (Pixel Data) contains. So for example if it looks like a 7, the Y-Vector contains the number 7 in there. We need to do this transformation, because we want to map our output to 10 output neurons in our network that fire when the according number is recognized.
6. Modeling the network
Now it is time to define a convolutional network to distinguish those numbers. Using the convolution and pooling tricks from part one of this series we can model a network that will be able to distinguish numbers from each other.
# defining the model
from keras.models import Sequential
from keras.layers import Dense, Dropout, Flatten
from keras.layers import Conv2D, MaxPooling2D
def network():
    model = Sequential()
    input_shape = (28, 28, 1)
    num_classes = 10

    model.add(Conv2D(filters=32, kernel_size=(3, 3), padding='same', activation='relu', input_shape=input_shape))
    model.add(MaxPooling2D(pool_size=2))
    model.add(Conv2D(filters=32, kernel_size=2, padding='same', activation='relu'))
    model.add(MaxPooling2D(pool_size=(2, 2)))
    model.add(Conv2D(filters=32, kernel_size=2, padding='same', activation='relu'))
    model.add(MaxPooling2D(pool_size=(2, 2)))
    model.add(Dropout(0.3))
    model.add(Flatten())
    model.add(Dense(500, activation='relu'))
    model.add(Dropout(0.4))
    model.add(Dense(num_classes, activation='softmax'))

    # summarize the model
    # model.summary()
    return model
So what did we do there? Well we started with a convolution with a kernel size of 3. This means the window is 3x3 pixels. The input shape is our 28x28 pixels. We then followed this layer by a max pooling layer. Here the pool_size is two so we downscale everything by 2. So now our input to the next convolutional layer is 14 x 14. We then repeated this two more times ending up with an input to the final convolution layer of 3x3. We then use a dropout layer where we randomly set 30% of the input units to 0 to prevent overfitting in the training. Finally we then flatten the input layers (in our case 3x3x32 = 288) and connect them to the dense layer with 500 inputs. After this step we add another dropout layer and finally connect it to our dense layer with 10 nodes which corresponds to our number of classes (as in the number from 0 to 9).
7. Training the model
#Training the model
model.compile(loss='categorical_crossentropy', optimizer=keras.optimizers.Adadelta(), metrics=['accuracy'])

model.fit(X_train, Y_train, batch_size=512, epochs=6, verbose=1,validation_data=(X_test, Y_test))

score = model.evaluate(X_test, Y_test, verbose=0)

print('Test loss:', score[0])
print('Test accuracy:', score[1])
We first compile the network by defining a loss function and an optimizer: in our case we select categorical_crossentropy, because we have multiple categories (as in the numbers 0-9). There are a number of optimizers that Keras offers, so feel free to try out a few, and stick with what works best for your case. I’ve found that AdaDelta (an advanced form of AdaGrad) works fine for me.
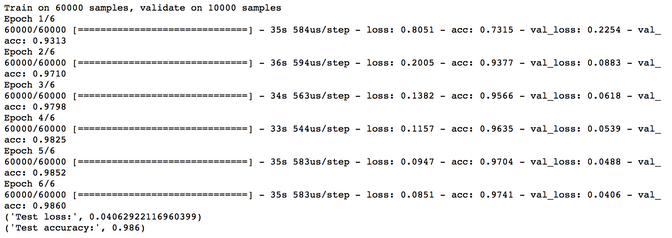
So after training I’ve got a model that has an accuracy of 98%, which is quite excellent given the rather simple network infrastructure. In the screenshot you can also see that in each epoch the accuracy was increasing, so everything looks good to me. We now have a model that can quite well predict the numbers 0-9 from their 28x28 pixel representation.
8. Saving the model
Since we want to use the model on our iPhone we have to convert it to a format that our iPhone understands. There is actually an ongoing initiative from Microsoft, Facebook and Amazon (and others) to harmonize all of the different deep learning network formats to have an interchangable open neural networks exchange format that you can use on any device. Its called ONNX.
Yet, as of today Apple devices work only with the CoreML format though. In order to convert our Keras model to CoreML Apple luckily provides a very handy helper library called coremltools that we can use to get the job done. It is able to convert scikit-learn models, Keras and XGBoost models to CoreML, thus covering quite a bit of the everyday applications. Install it with “pip install coremltools” and then you will be able to use it easily.
coreml_model = coremltools.converters.keras.convert(model,
                                                    input_names="image",
                                                    image_input_names='image',
                                                    class_labels=['0', '1', '2', '3', '4', '5', '6', '7', '8', '9']
                                                    )
The most important parameters are class_labels, they define how many classes the model is trying to predict, and input names or image_input_names. By setting them to
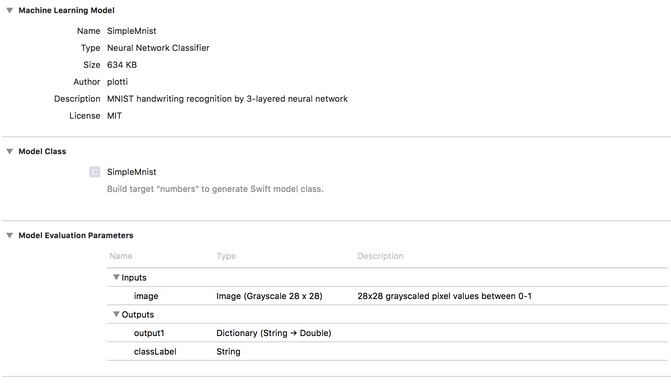
The only thing left is to add some metadata to your model. With this you are helping all the developers greatly, since they don’t have to guess how your model is working and what it expects as input.
#entering metadata
coreml_model.author = 'plotti'
coreml_model.license = 'MIT'
coreml_model.short_description = 'MNIST handwriting recognition with a 3 layer network'
coreml_model.input_description['image'] = '28x28 grayscaled pixel values between 0-1'
coreml_model.save('SimpleMnist.mlmodel')

print(coreml_model)
9. Use it to predict something
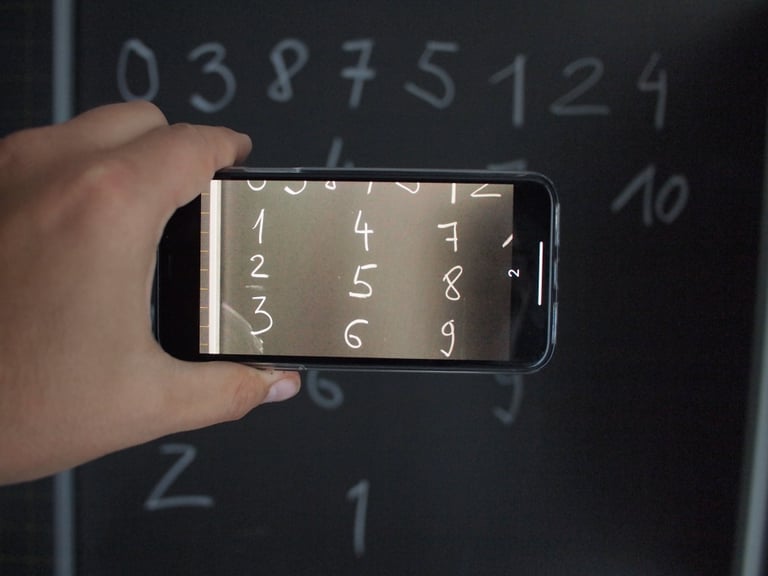
After saving the model to a CoreML model we can try if it works correctly on our machine. For this we can feed it with an image and try to see if it predicts the label correctly. You can use the MNIST training data or you can snap a picture with your phone and transfer it on your PC to see how well the model handles real-life data.
#Use the core-ml model to predict something
from PIL import Image
import numpy as np
model =  coremltools.models.MLModel('SimpleMnist.mlmodel')
im = Image.fromarray((np.reshape(mnist_data()[0][0][12]*255, (28, 28))).astype(np.uint8),"L")
plt.imshow(im)
predictions = model.predict({'image': im})
print(predictions)
It works hooray! Now it's time to include it in a project in XCode.
Porting our model to XCode in 10 Steps
Let me start by saying: I am by no means a XCode or Mobile developer. I have studied a quite a few super helpful tutorials, walkthroughs and videos on how to create a simple mobile phone app with CoreML and have used those to create my app. I can only say a big thank you and kudos to the community being so open and helpful.
1. Install XCode
Now it's time to really get our hands dirty. Before you can do anything you have to have XCode. So download it via Apple-Store and install it. In case you already have it, make sure to have at least version 9 and above.
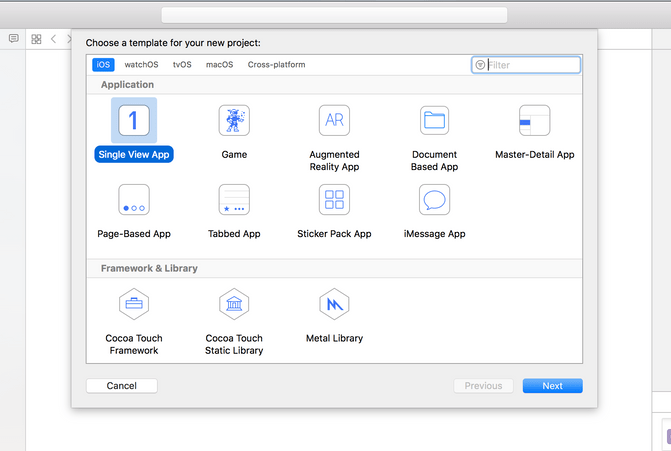
2. Create the Project
Start XCode and create a single view app. Name your project accordingly. I did name mine “numbers”. Select a place to save it. You can leave “create git repository on my mac” checked.
3. Add the CoreML model
We can now add the CoreML model that we created using the coremltools converter. Simply drag the model into your project directory. Make sure to drag it into the correct folder (see screenshot). You can use the option “add as Reference”, like this whenever you update your model, you don’t have to drag it into your project again to update it. XCode should automatically recognize your model and realize that it is a model to be used for images.

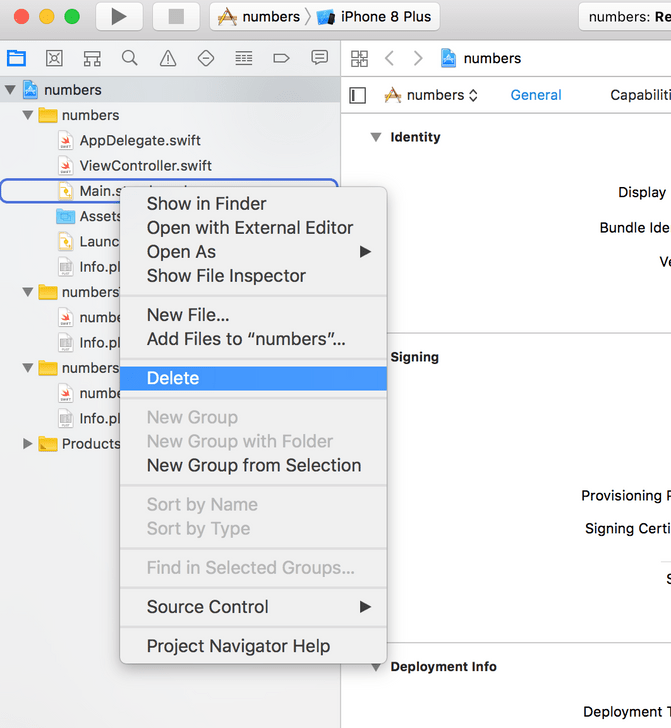
4. Delete the view or storyboard
Since we are going to use just the camera and display a label we don’t need a fancy graphical user interface - or in other words a view layer. Since the storyboard in Swing corresponds to the view in the MVC pattern we are going to simply delete it. In the project settings deployment info make sure to delete the Main Interface too (see screenshot), by setting it to blank.
5. Create the root view controller programmatically
Instead we are going to create view root controller programmatically by replacing the funct application in AppDelegate.swift with the following code:
// create the view root controller programmatically
func application(_ application: UIApplication, didFinishLaunchingWithOptions launchOptions: [UIApplicationLaunchOptionsKey: Any]?) -> Bool {
    // create the user interface window, make it visible
    window = UIWindow()
    window?.makeKeyAndVisible()

    // create the view controller and make it the root view controller
    let vc = ViewController()
    window?.rootViewController = vc

    // return true upon success
    return true
}
6. Build the view controller
Finally it is time to build the view controller. We will use UIKit - a lib for creating buttons and labels, AVFoundation - a lib to capture the camera on the iPhone and Vision - a lib to handle our CoreML model. The last is especially handy if you don’t want to resize the input data yourself.
In the Viewcontroller we are going to inherit from UI and AV functionalities, so we need to overwrite some methods later to make it functional.
The first thing we will do is to create a label that will tell us what the camera is seeing. By overriding the viewDidLoad function we will trigger the capturing of the camera and add the label to the view.
In the function setupCaptureSession we will create a capture session, grab the first camera (which is the front facing one) and capture its output into captureOutput while also displaying it on the previewLayer.
In the function captureOutput we will finally make use of our CoreML model that we imported before. Make sure to hit Cmd+B - build, when importing it, so XCode knows it's actually there. We will use it to predict something from the image that we captured. We will then grab the first prediction from the model and display it in our label.
\\define the ViewController
import UIKit
import AVFoundation
import Vision

class ViewController: UIViewController, AVCaptureVideoDataOutputSampleBufferDelegate {
    // create a label to hold the Pokemon name and confidence
    let label: UILabel = {
        let label = UILabel()
        label.textColor = .white
        label.translatesAutoresizingMaskIntoConstraints = false
        label.text = "Label"
        label.font = label.font.withSize(40)
        return label
    }()

    override func viewDidLoad() {
        // call the parent function
        super.viewDidLoad()
        setupCaptureSession() // establish the capture
        view.addSubview(label) // add the label
        setupLabel()
    }

    func setupCaptureSession() {
        // create a new capture session
        let captureSession = AVCaptureSession()

        // find the available cameras
        let availableDevices = AVCaptureDevice.DiscoverySession(deviceTypes: [.builtInWideAngleCamera], mediaType: AVMediaType.video, position: .back).devices

        do {
            // select the first camera (front)
            if let captureDevice = availableDevices.first {
                captureSession.addInput(try AVCaptureDeviceInput(device: captureDevice))
            }
        } catch {
            // print an error if the camera is not available
            print(error.localizedDescription)
        }

        // setup the video output to the screen and add output to our capture session
        let captureOutput = AVCaptureVideoDataOutput()
        captureSession.addOutput(captureOutput)
        let previewLayer = AVCaptureVideoPreviewLayer(session: captureSession)
        previewLayer.frame = view.frame
        view.layer.addSublayer(previewLayer)

        // buffer the video and start the capture session
        captureOutput.setSampleBufferDelegate(self, queue: DispatchQueue(label: "videoQueue"))
        captureSession.startRunning()
    }

    func captureOutput(_ output: AVCaptureOutput, didOutput sampleBuffer: CMSampleBuffer, from connection: AVCaptureConnection) {
        // load our CoreML Pokedex model
        guard let model = try? VNCoreMLModel(for: SimpleMnist().model) else { return }

        // run an inference with CoreML
        let request = VNCoreMLRequest(model: model) { (finishedRequest, error) in

            // grab the inference results
            guard let results = finishedRequest.results as? [VNClassificationObservation] else { return }

            // grab the highest confidence result
            guard let Observation = results.first else { return }

            // create the label text components
            let predclass = "\(Observation.identifier)"

            // set the label text
            DispatchQueue.main.async(execute: {
                self.label.text = "\(predclass) "
            })
        }

        // create a Core Video pixel buffer which is an image buffer that holds pixels in main memory
        // Applications generating frames, compressing or decompressing video, or using Core Image
        // can all make use of Core Video pixel buffers
        guard let pixelBuffer: CVPixelBuffer = CMSampleBufferGetImageBuffer(sampleBuffer) else { return }

        // execute the request
        try? VNImageRequestHandler(cvPixelBuffer: pixelBuffer, options: [:]).perform([request])
    }

    func setupLabel() {
        // constrain the label in the center
        label.centerXAnchor.constraint(equalTo: view.centerXAnchor).isActive = true

        // constrain the the label to 50 pixels from the bottom
        label.bottomAnchor.constraint(equalTo: view.bottomAnchor, constant: -50).isActive = true
    }
}
Make sure that you have changed the model part to the naming of your model. Otherwise you will get build errors.
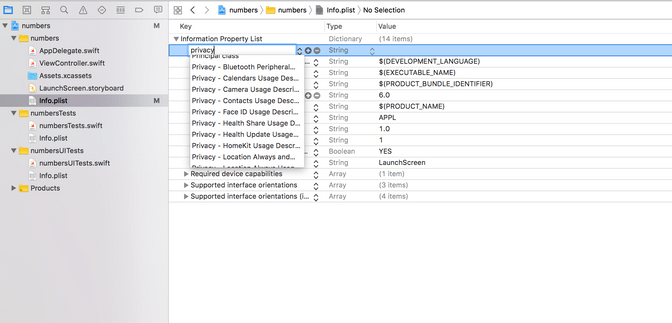
6. Add Privacy Message
Finally, since we are going to use the camera, we need to inform the user that we are going to do so, and thus add a privacy message “Privacy - Camera Usage Description” in the Info.plist file under Information Property List.
7. Add a build team
In order to deploy the app on your mobile iPhone, you will need to register with the Apple developer program. There is no need to pay any money to do so, you can register also without any fees. Once you are registered you can select the team Apple calls it this way) that you have signed up there in the project properties.
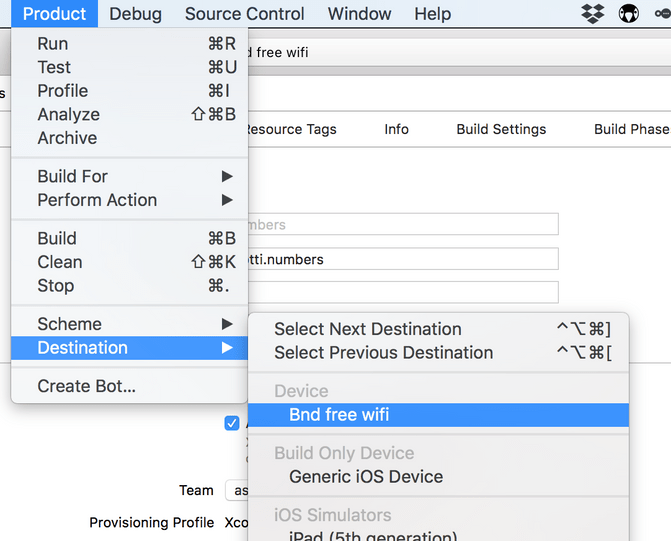
8. Deploy on your iPhone
Finally it's time to deploy the model on your iPhone. You will need to connect it via USB and then unlock it. Once it's unlocked you need to select the destination under Product - Destination- Your iPhone. Then the only thing left is to run it on your mobile: Select Product - Run (or simply hit CMD + R) in the Menu and XCode will build and deploy the project on your iPhone.
9. Try it out
After having had to jump through so many hoops it is finally time to try out our app. If you are starting it for the first time it will ask you to allow it to use your camera (after all we have placed this info there). Then make sure to hold your iPhone sideways, since it matters on how we trained the network. We have not been using any augmentation techniques, so our model is unable to recognize numbers that are “lying on the side”. We could make our model better by applying these techniques as I have shown in this blog article.
A second thing you might notice is, that the app always recognizes some number, as there is no “background” class. In order to fix this, we could train the model additionally on some random images, which we classify as the background class. This way our model would be better equipped to tell apart if it is seeing a number or just some random background.
Conclusion or the famous “so what”
Obviously this has is a very long blog post. Yet I wanted to get all the necessary info into one place in order to show other mobile devs how easy it is to create your own deep learning computer vision applications. In our case at Liip it will most certainly boil down to a collaboration between our data services team and our mobile developers in order to get the best of both worlds.
In fact we are currently innovating together by creating an app that will be able to recognize animals in a zoo and working on another small fun game that lets two people doodle against each other: You will be given a task, as in “draw an apple” and the person who draws the apple faster in such a way that it is recognised by the deep learning model wins.
Beyond such fun innovation projects the possibilities are endless, but always depend on the context of the business and the users. Obviously the saying “if you have a hammer every problem looks like a nail to you” applies here too, not every app will benefit from having computer vision on board, and not all apps using computer vision are useful ones as some of you might know from the famous Silicon Valley episode.
Yet there are quite a few nice examples of apps that use computer vision successfully:
- Leafsnap, lets you distinguish different types of leafs.
- Aipoly helps visually impaired people to explore the world.
- Snooth gets you more infos on your wine by taking a picture of the label.
- Pinterest has launched a visual search that allows you to search for pins that match the product that you captured with your phone.
- Caloriemama lets you snap a picture of your food and tells you how many calories it has.
As usual the code that you have seen in this blogpost is available online. Feel free to experiment with it. I am looking forward to your comments and I hope you enjoyed the journey. P.S. I would like to thank Stefanie Taepke for proof reading and for her helpful comments which made this post more readable.