
In this article I will show you in 3 easy steps how to actually get started with an IoT a project build with a particle photon and a node.js server in order to have your own dashboard. I admit, IoT is a bit of a trend these days, and yes I jumped on the bandwaggon too. But since visiting the maker faire Zürich I have seen so many enthousiastic people building things, it has also motived me to also try out something. Thats why I decided to count the people that are running up and down our stairs at Liip. Follow along if you are – like me – a total noob when it comes to connecting wires but still want to experience the fun of building IoT devices.

These days there are a myriad of possible IoT devices, among the most popular are the Arduino, Raspberry Pi, ESP8266 or the Spark/Particle (see this blogpost which gives you a nice overview of the different models). For me the Particle Photon was a great choice because it is cheap (19 USD), has an online IDE (see screenshot below), and works mostly out of the box. The sensor for the project can be bought online at the maker-show.ch for about CHF 19. If you buy them in bulk from a chinese retailer, you can cut the cost probably down to a few bucks per sensor.
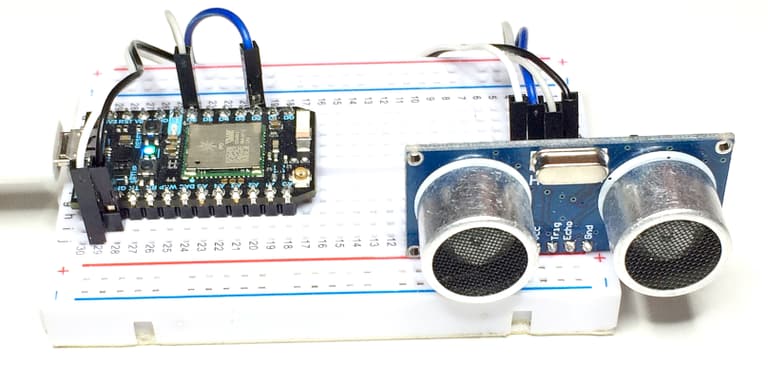
Step 1: Making the IoT Device
When you bought one of these starter kits, those Particle Photons come with such a wiring board where you can plug in the cables easily. If not you can buy one anywhere for a CHF 1-3. I followed this blog post about connecting the sensor. That worked great, only don't make the same mistake as I did to put two wires at the same “height” – they should be set off one pin because otherwise you will create a short circuit. (Btw. from my experience a short circuit apparently luckily doesn't kill the photon, but forces it to turn itsself off.)
What I did additionally is I've connected it to a normal USB powerbank and I've put the whole thing it into a little lunch box where I have drilled out the holes for the sensor so I can put it somewhere and it doesn't break that easily.

Step 2: Writing the Firmware
Ususally those IoT devices work in such a way that you write a piece of program that runs on the device. This piece of software or simply firmware is responsible for handling the input form the sensor and sending it somewhere over the internet. The photon devices come with a so called tinker firmware which lets you use your mobile phone to turn certain bits on and off. Its nice to start with it, but for this sensor we can't just turn it on and then see something change on the phone. It is because this sensor needs to constantly send out a signal (echo) every couple of microseconds and then listen for it. So we are going to replace this firmware with our own firmware that is going to take the signal of the HC-SR04 sensor process it and send it to the server.
Now luckily, on the blog post above the author has also already provided some nice firmware code that works well with this sensor. All firmware code is written in C++, but don't worry its quite easy to understand. Lets have a look a some points:
The actual ping
So what we are doing here is sending a signal every 10 ms on the trigger_pin and then are listening on the echo_pin for the signal to come back. It basically works like a echolot bat, send out something and the faster the signal comes back, the closer you are to the sensor.
    digitalWriteFast(trig_pin, HIGH);
    delayMicroseconds(10);
    digitalWriteFast(trig_pin, LOW);
    duration = pulseIn(echo_pin, HIGH);
The setup
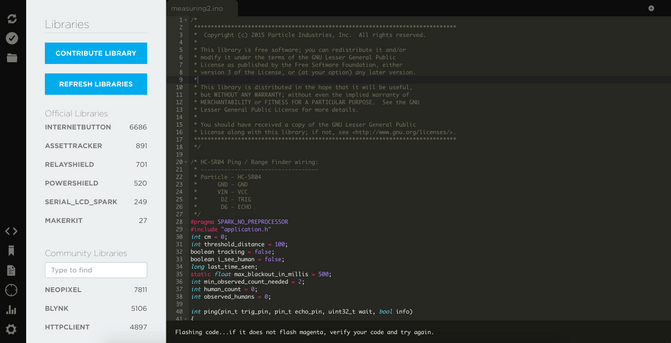
What is nice about the particle devices is that you can connect those to your computer via USB and then download the offline ATOM IDE. In this IDE you can select the USB port to listen to (see screenshot below). You can then run your little firmware and make it output stuff to the console. Like this you can debug your tiny device by sending signals to the console and having them displayed on your computer – thats why we need to open this serial port there in setup.
    Serial.begin(115200);
    Particle.variable("cm", cm);
    Particle.variable("human_count", &human_count, INT)
The REST API
The second cool thing about the particle is that any variable that you use in the code can be made accessible online via a REST API. This makes it insanely easy to access data from your device; might it be for debugging reasons or for actually interacting with the device. For this you need to define which variables you want to make accessible in the setup method. So for example the variable above “human_count” can be made accessible online via https://api.spark.io/v1/devices/240034001147343339383037/human_count?access_token=abcde1234. (Notice that this is just a dummy link, I've replaced the access token with random chars)

The main loop
The main loop basically does the following, it sends out a signal every 10ms and once the measured distance is below a certain threshold, we say we see a human. As long as this distance stays under that threshold we say we are still tracking the same person. This might occur when someone is standing in front of the device. We don't want to count this person multiple times but just once. Additionally we have some timeouts, e.g. saying how long should a minimal distance be, between seeing two humans. In the end the sensor at in the loop says ok lets count this person. We output some nice debugging information, set up human_count +1 and most important of all publish this variable as a stream to the net.
          human_count++;
          Serial.printf("Humans %2d:", human_count);
          Particle.publish("humancount", String(human_count));
The stream
Now the last point is the most interesting one. In order to have a nice real time application we could potentially simply query the REST API constantly and ask how many persons we have counted so far. This is doable, but its slow, not actually in realtime and very expensive for the server. Instead we will create a stream of events that is published to the net and consumed by our server. The server can listen to this event, and whenever a new person comes along we can update our widget. You can actually curl this stream via for example: curl “https://api.spark.io/v1/devices/240034001147343339383037/human_count?access_token=abcde1234”
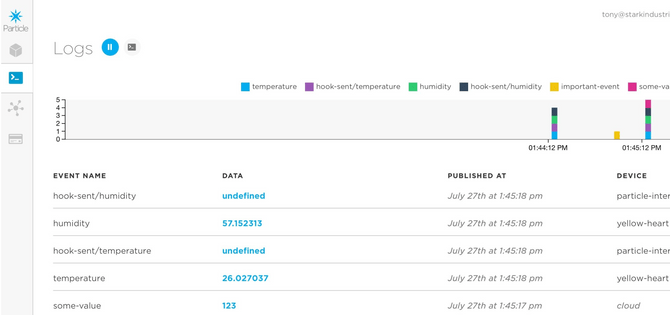
and see those events fireing in realtime. Or you can go the really nice particle dashboard that the particle people have already build and have a look there. It looks like this:
So bascially you are done. You have a little device that is counting, when a person walks by, and it is both making the total count accessible via REST API and is producing a stream of events that can be consumed by our server. The only thing left is to build tiny little dashboard. So we did that too.
Step 3: The dashboard
The dashboard is a tiny node application with a d3.js widget in the frontend. The backend is served by the node application and in the frontend we have an event listener that is bound to our stream of events that we are receiving from the photon. Now normally you woundn't want to build it this way, because you would want to have some sort of database or buffer in between. This buffer would log these events and make it easy to aggregate and query those. For that you might use google pubsub or the opensource kafka alternative. Both are fine, but for the sake of brevity we won't go into details how to publish and subscribe to those services and how to save it in the database. Lets save it for another blogbost.
function connect() {
    console.log('connecting')
    var deviceID = "12345";
    var accessToken = "abcdefg";
    var eventSource = new EventSource("https://api.spark.io/v1/devices/" + deviceID + "/events/?access_token=" + accessToken);

    eventSource.addEventListener('open', (e) => {
        console.log("Opened!"); },false)

    eventSource.addEventListener('error', (e) => {
        console.log("Errored!"); },false)

    return eventSource
}
...
eventSource.addEventListener('humancount', (e) => {
    let parsedData = JSON.parse(e.data)
    console.log('Received data', parsedData)
    pplCount.innerHTML = parsedData.data
    displayChart.newPoint(0.3)
}, false)
So what we see above, is that we simply create an event source that connects to our stream and an event listener that adds another datapoint to our widget once someone walks by. Thats basically it. You migh want to checkout the project code on github and leave a little star if you like it. Below you can see our little widget in action. Notice the small little red spikes that occur when actual people walking by.
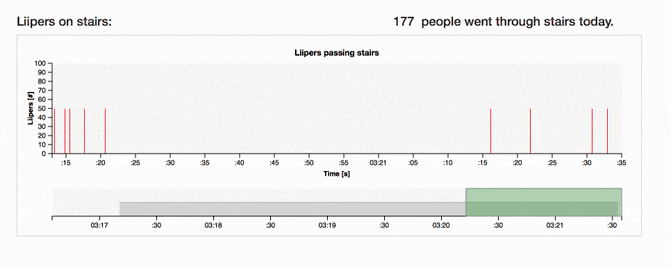
Our widget in action. Notice the red bars represent people walking by in real-time.
Where to go from here?
Well for starters if you were to aggregate this data over minutes, weeks or hours, you would actually get a nice chart of how frequented our steps are and on what weekdays people are walking them the most. For that we would want to save our events to a database and query it with a kibana dashboard or use a prebuilt IoT infrastructure for it like ubidots project.
We could improve our battery life by just collecting the datapoints and not constantly sending them over wifi, because this is draining our little battery pack quite fast. But none the less our experiments have shown that with a small lipstick battery pack this device can run for up to 24 hours. So this might be enough in order to deploy it in a one time measurement scenario, like in a shop to measure how many customers are walking by certain isles for example.
On the other hand you might want to deploy those devices with a fixed power source and monitor data constantly to acualy learn something about the seasonality of the data, or use it in a completely differen way.
We were thinking to connect those devices to PIR sensors and placing them into our meeting rooms. Like this we could have smart meeting rooms that actually know if there are persons in them or not. Based on that we might discover that often a meeting room looks booked in the calendar but is actually empty. But that is material for another project.
There is btw. a great ressource of photon tutorials out there, if you want to build more things.
I hope you enjoyed this little IoT experiment and have found some motivation to get started yourself.
Cheers
Thomas Ebermann and Lukasz Gintowt