
Well… That’s how it could have happened in my mind, as a backend developer. The reality was more like my fellow frontend and mobile developers saying "Of course I can develop a sexy app for your backend, but no way I’m exposing a client secret out in the wild. You better pump your OAuth authorization flow up!”
And that’s how I discovered Pixie!
Why bother with PKCE anyway?
PKCE is an evolution of the authorization code flow. It is more secure than the good old implicit flow to get a token from your authorization server. The description made by oauth.com was a light in the darkness for my understanding:
The Proof Key for Code Exchange (PKCE, pronounced pixie) extension describes a technique for public clients to mitigate the threat of having the authorization code intercepted. The technique involves the client first creating a secret, and then using that secret again when exchanging the authorization code for an access token. This way if the code is intercepted, it will not be useful since the token request relies on the initial secret.
And if you still have doubts, I urge you to read this great blogpost on Okta’s website.
Once upon a time, there was a very private endpoint
First thing first, all the code shared in the example below is available on Github. Feel free to clone or browse the repository to check every detail you may need.
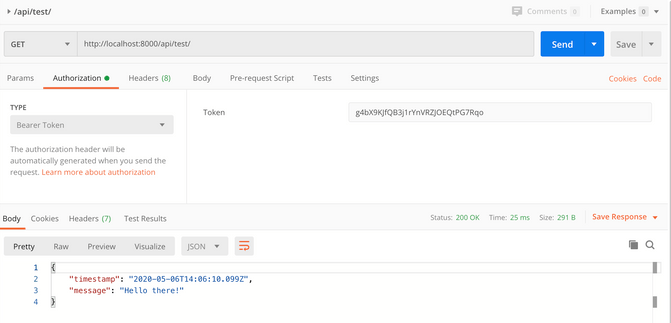
My starting point is an API serving a unique endpoint /api/test/. I decorated it with django’s login_required to be sure the user is authenticated to access it.
Let’s see how to expose the /api/test/ endpoint to be used by our brand new javascript single page application named my-sexy-spa. Before digging, I should mention that, at this point, I integrated django-oauth-toolkit to my project using their tutorial. Thus, bearer tokens can already be used to authenticate users.
Configure my new OAuth application
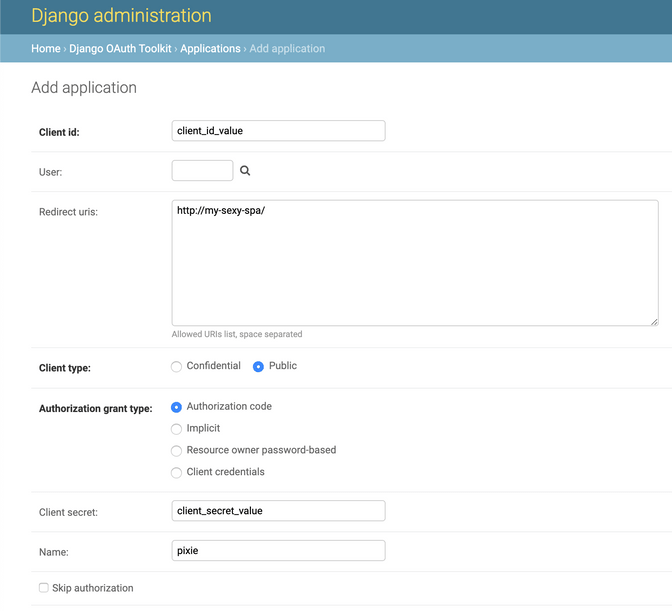
I create a new OAuth application for my-sexy-spa with the authorization_code grant type. As my-sexy-spa is (or will be) our own trusted app, “Skip authorization” is checked to prevent the user from clicking another “Authorize” button after login.
Note: client_id and client_secret are human-readable for the sake of this article. Use random generated values for any production project.
Authorization process
As I’m no javascript geek myself, I’ll produce code_challenge with bash tools and detail the authorization process using Postman. I’m sure that once I’ve figured out the whole mechanism, my frontender friends will have no difficulty implementing it with their favourite Javascript framework.
Create a code_challenge
First, the client needs to create a random code_verifier. This code_verifier must be hashed with SHA-256 and base64 url-encoded. For implementation details, see oauthlib code comment.
Note: If the client cannot produce a SHA-256 hash, the code_challenge_method can be set to plain. Use it only if necessary as it’s considered less secure.
# My code_verifier  is 12345
# My code_challenge is WZRHGrsBESr8wYFZ9sx0tPURuZgG2lmzyvWpwXPKz8U
h=($(echo -n "12345" | shasum -a 256 )) ;echo $h|xxd -r -p |base64
Request an authorization code
Then an authorization code must be requested with the following parameters.
Note: The code_challenge_method parameter is case sensitive. s256 value will produce an “incorrect_grant” error.
| Query parameter | Value |
|---|---|
| client_id | client_id_value |
| response_type | code |
| redirect_uri | http://my-sexy-spa/ |
| code_challenge | WZRHGrsBESr8wYFZ9sx0tPURuZgG2lmzyvWpwXPKz8U |
| code_challenge_method | S256 |

The response to this request is a redirection to the django login page before accessing the actual /o/authorize/ endpoint.
As mentioned before, my-sexy-spa is a trusted application, and I checked the “Skip authorization”. Meaning that when I copied the Location header value into my browser and logged in, I didn’t even see the actual /o/authorize/ form and got redirected directly to http://my-sexy-spa/?code=Z3t8ueGvw5lBRWWqf8wlq62baLgoGa instead.
my-sexy-spa isn’t real at this point. But I still manage to get the authorization code produced by my authorization server.
Request an authentication token
Now that I have a valid authorization code, it’s time to get an authentication token. To do so, I post the following form to the /o/token/ endpoint.
| Form field | Value |
|---|---|
| client_id | client_id_value |
| grant_type | authorization_code |
| redirect_uri | http://my-sexy-spa/ |
| code_verifier | 12345 |
| code | Z3t8ueGvw5lBRWWqf8wlq62baLgoGa |
| scope | read write |
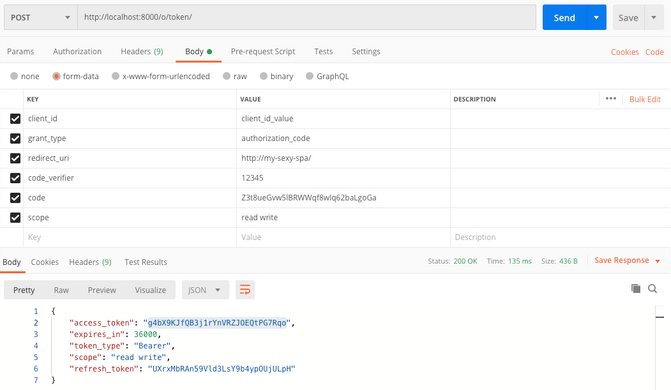
As you can see, I received a shiny new authentication bearer token.
Use the authorization token to access your API
First, I check that I’m redirected to the login form if I try to access my /api/test/ endpoint unauthenticated.
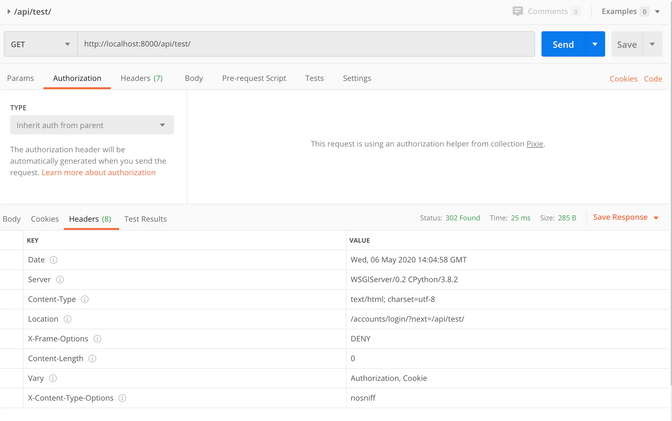
Finally, I get to see what my wonderful endpoint has to offer using the bearer token to authenticate.
Further thoughts
I wrote this blogpost because I lacked a similar one to help me implement the Authorization code + PKCE flow on our Houston product API. I hope It’ll help you. If you want to read more about the subject, here are the resources I used while writing.
https://oauth.net/
https://www.oauth.com/
https://oauthlib.readthedocs.io/en/latest/oauth2/server.html
https://django-oauth-toolkit.readthedocs.io/en/latest/